5 Basic Yoga Poses to Help you Get Back in Shape!

For me, yoga tops the chart when it comes to fitness. It is an ancient Indian practice that combines both stretching and strengthening poses along with meditation and some deep breathing exercise which takes care of an individual’s physical as well as mental well being. It cleanses and rejuvenates our body both from outside and within. One can actually feel the difference if yoga is practiced regularly and in the right way. However, if you are a beginner then you might feel overwhelmed hence one might begin their practice under the guidance of an expert yoga teacher at yoga teacher training in India program. However, we have come up with an at-home yoga sequence to get you started.
Here are some basic yoga poses to help you get back in shape….
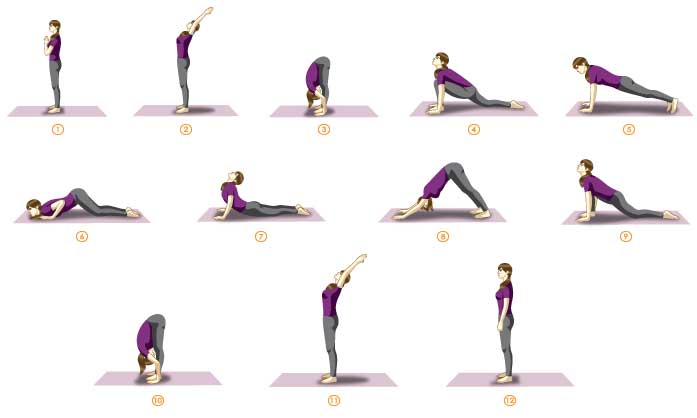
Surya-namaskar
Surya-namaskar comprises of 12 powerful postures. It is one of the basic vinyasa flows you will learn under a vinyasa yoga teacher training in India program. Start with 10 to 12 rounds in a week then gradually increase.
Start with 12 rounds in the first week and as you move on increase the number of reps (per week) as per your strength and endurance. Listen to your body and do not over do it. Surya-namaskar comprises of 12 positions…
Position 1. Stand straight with your feet together and hands by the side. Now bring your palms together close to your chest in Namaskar hand-gesture, breathing normally.
Position 2. Inhale and raise your hands upwards. Now arch your back and stretch your arms as far as you can. Breathe normally once you are in this position.
Position 3. While exhaling, bend forward and try to touch your toes with your hands without bending the knees. Go as far as you can without stressing the body. Look downwards and breathe normally once you are in this position.
Position 4. Place your palms on the floor while inhaling and bend the right leg in between your hands at a 90-degree angle from the floor. Also stretch your left leg backwards as far as you can. Look upwards and breathe normally once you are in this position.
Position 5. Exhale and put your right leg behind so that it is in line with your left leg. Make sure that your hands are aligned below with your shoulders. Once you are in this position, breathe normally keeping the shoulders, back and hips in one straight line.
Position6. While breathing normally bend your elbows, chin and knees towards the floor. Now raise your hips upwards keeping your elbows close to the sides. Hold this position for some time, breathing normally.
Position 7. Inhale and raise your upperbody. Arch your back as far as you can, making sure that the waist touches the floor all the time. Breathe normally once you are in this position.
Position 8. Exhale and raise your hips upwards with your palms flat on the floor. Keep your knees straight and heels touching the floor. Look downwards and breathe normally once you are in this position.
Position 9. Inhale and bring your left foot forward in between your hands. With palms flat on the floor, arch your back as far as you can. Breathe normally once you are in this position.
Position 10.While exhaling, bring your right foot forward and in line with your left foot. Try to touch your toes with your hands without bending the knees. Look downwards and breathe normally once you are in this position.
Position 11.Bring your palms together , inhale and raise your hands upwards. Arch your back and stretch your arms as far as you can. Breathe normally once you are in this position.
Position12.Come back to the starting Namaskar hand-gesture position slowly while exhaling.
This completes 1 round of Surya-namaskar.
Ardha Halasana
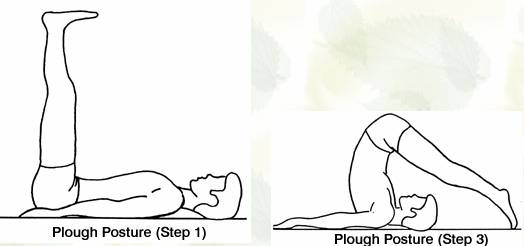
This pose is my personal favorite because it makes my abdomens work real hard. Lie flat on your back and hands by the side of your body, palms resting on the floor. While exhaling, raise both legs slowly first upto 45 degree and then 90 degree angles. At each angle rest and count for 5 seconds, breathing normally. Inhale while bringing down your legs and at each angle rest and count for 5 seconds, breathing normally.
Start with 20 rounds in the first week and as you move on increase the number of reps (per week) as per your strength and endurance. Listen to your body and do not overdo it.
Dhanurasana:
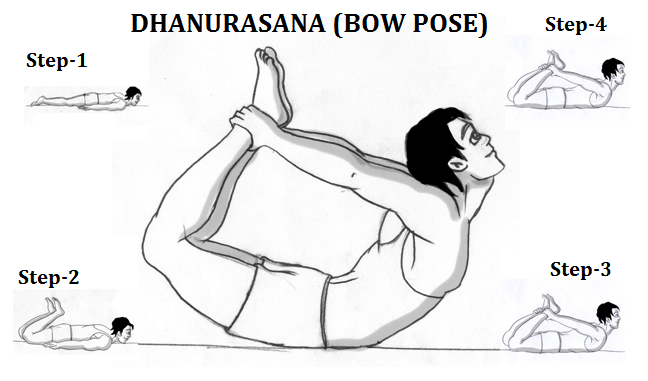
Lie flat on your stomach, feet together, and hands by the side and forehead touching the floor. Now bend your knees and hold the ankles with both the hands. Raise your upper body and legs upwards while inhaling. Hold this position for 5 seconds, breathing normally. Exhale and come back to the original position. Keep increasing the time period of the held position by 5 seconds on a weekly basis. The maximum should reach around 25-30 seconds, after which you can increase the number of reps.
Start with 15 rounds in the first week and as you move on increase the number of reps (per week) as per your strength and endurance. Customize according to your needs and don’t stress your body too much!
Side-bending Chakrasana
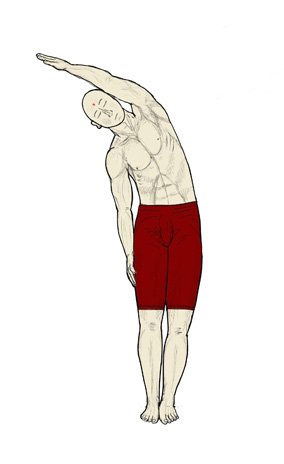
Stand with your feet together and hands by the side of the body. Now raise your right hand up and stretch while bending your body towards left side. Hold this position for some time and come back to the original position. Repeat the same with the other side.
Start with 20 rounds (10 on each side) in the first week. Customize according to your strength and endurance per week, and don’t stress your body too much!
Kapalbhati
Kapalbhati is really helpful to make our body function better from within. It improves and strengthens the nervous system. Also it is improves the blood-circulation and digestive system inside our body. Let’s learn how to do this simple yet very beneficial exercise…
Exhale forcefully through your nose,2 strokes in 1 second. If you are a beginner, start with 30 strokes and do a total of 2 rounds. As you get used to it, increase the number of strokes and rounds accordingly per week. Advanced practitioners can do 100 strokes,5 rounds at a stretch.
